If you prefer the printable pdf version of this project, click here:
http://www.box.com/s/amvu7z2h88jmkbvf16t8
Text version:
1. Gather items needed
Old stereo cabinet, sand paper, paint for outside & accent paint for inside cabinet, paint brushes, newspaper (to put down on floor), fabrics for pillows, hammer, small nails, sewing machine, matching threads, hand-sewing needle, tape, scissors, polyfil, plywood cut to fit back, velcro (sew on kind & sticky back kind.)
2. Choose your paint & fabrics
Remove any unnecessary hardware. Sand all surfaces to be painted. This will scratch up the surface & allow the paint to stick to the surface. Try to get one of your cats to help you sand to make the job go a little faster.4. Paint Inside of cabinet
Paint inside of cabinet & back panel with your accent color. You can put the back panel on first but I think its easier to paint it, then attach to the back of your cabinet. It will probably take several coats to cover well. Its best if you DON'T let your cats help with the painting. They will be ready for a nap after sanding anyway
5. Add back to cabinet
6. Paint Outside & back of cabinet
Paint outside, edges and back (if you want) and allow to dry. If you are going with a light color, it will take several coats. I think I painted mine about 4-5 coats. You can work on the pillows while you are waiting for the paint to dry.
7. Antique your cabinet
Hold your piece of plywood in place and nail with small nails. You can glue it too if you want...but I didn't want to....
When completely dry, sand the piece a little to make it look old. Especially concentrate on the edges and corners. I didn't sand the inside at all, but you can do that too if you want. I didn't seal mine because I like the flat finish, but if you choose to seal it, do it now, before you add the pillows and be SURE it is dry before moving on.
8. Measure for pillow
Measure inside your cabinets for the pillows. Add 1/2" to the measurements. For example, my shelves were 13" x 17.5" so I made my pillows 13.5" x 18". I wanted to make my pillows thick, so I added a strip 3.5" wide, but that isn't necessary and I don't think I would do it that way if I had it to do over.
9. Cut fabric & get ready to sew
Cut out all pieces for your pillow. I made a pillow for the top, but didn't like the look. You might like the look and want to try it. Cut 2 pieces for each pillow. If you want the gusset to make the pillows thick, cut it 3.5" (or the size thickness you want) and long enough to go all around your pillow, plus a little extra. The extra can be easily trimmed away.
1
0. Add velcro strips
I used 2 sets of velcro strips to hold my pillows in place. (You can leave off this step) I matched a sew on strip to a sticky back strip. Sew 2 strips on the back of each pillow. Stick the sticky back one on the sewn on piece but don't remove sticky back just yet...
11. Sew Pillows
If you are making pillows with 2 pieces, just sew the 2 pieces together with a small opening for turning & stuffing. If you are addign the gusset, pin the strip to the top piece (wrong sides together) and sew all the way around, matching the strip to the corners as you sew. Pin the bottom piece to gussett and repeat, leaving a small opening to turn & stuff. Stuff lightly and hand sew the opening.
12. Add pillows/final approval
Place pillows on shelves and get final approval on placement. When you get them where you want them remove strip from the sticky back and place on shelf. Press down and mash them firmly against the shelf so they will stay put. Step back and admire your work--along with your cats.
13. Add cats
Place cats on shelves in a pleasing manner....or just wait and they will find the perfect spot!
14. Little extras
I sprayed some catnip spray on the pillows--some like it, some could care less. I thought later that on the taller shelf you could put an eye screw and hang a toy from the top on the inside. You could line the sides (inside) with cork or sisal for scratching. Or you could elminate the pillow in the middle and make a big hole for them to climb through. OR Cut a hole in the side, just above the middle shlf and build some steps for them to climb on to get to the 2nd level!
Note: you are welcome to place this tutorial on your blog or website, but you must link it back to my blog or website (below), give credit to Denise White of the Cat's Pyjamas and you must include all pages,
www.thecatspyjamas.typepad.com or www.thecatspyjamaspatterns.com
You may not sell this project or tutorial or print in a publication without my permission. Any questions, email denise@scottsboro.org

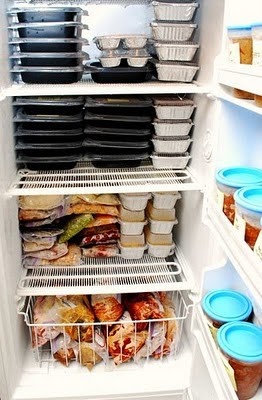 Ever since I saw this photo of someone's freezer on joelens.blogspot.com, I have been
 We've had a new kitty hanging around for a couple of weeks. I was hoping to find him a home on my own, but my kitties outside were so upset by having him here. Monday I took him to a local no-kill shelter. I was sad to take him, but I know he will find a good home. All his tests were negative, so he is ready to be neutered and start looking for his new home! I wish I could keep them all, but at 13, I am pretty full here. They can get expensive and I want to be able to take good care of the ones I have now. Maybe someday when I am rich and don't have to work.....I am still waiting for that day though!!